Getting Started
4 min read
Rapidomize platform allows you to rapidly build, deploy, and run services & applications. The platform provides workflows & widgets to build your services & applications easily.
In Rapidomize platform, we name a workflow as Intelligent Connected App, in short
The first Node of a workflow starts execution of the workflow service/application logic. This first Node is called a Trigger and other Nodes in the workflow are called Actions. Actions can process/tranform your data or connect to remote services such as SaaS apps, integrate to your ERP systems or databases to send, receive or store data.
For more information refer ICApp
How to create an ICApp
Following example assumes that you have already Signed Up with Rapidomize.
Note
As a pre requisite, choose an existing project or create a new project before creating your-
To start creating an ICApp workflow, select Intelligent Connected Apps from the left hand side menu and then click on Create New ICApp button on the top-right hand corner of your screen.
-
Specify a name for your
in the screen. 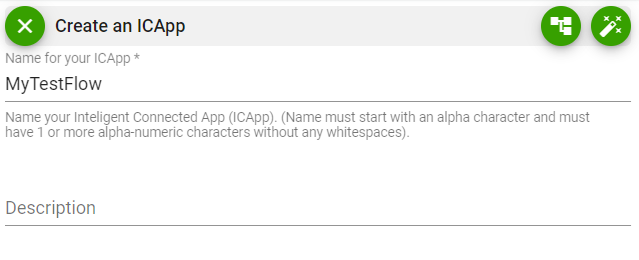
-
From here you can select Create/Edit button
 to proceed creating your
 . It allows you to drag and drop or rearrange Nodes of the and it is flexible to layout the flow of the Nodes as per your preference. -
Select App/Service that
Triggersyourfrom the list of Apps/Services. When an Eventoccurs in the selected App/Service, your workflow will be Triggered (When timer ticks in a scheduled trigger or new/updated data is available for processing) -
If the App/Service you selected requires an account to access it (Authorization is not required in some apps), provide authorization details as requested.

-
If you don’t have an account with the selected App/Service, create an account first, and use it for authorization. E.g: If you select Google Sheets as your
Triggerapp, and when you authorize Rapidomize to access the service, your screen will appear as follows.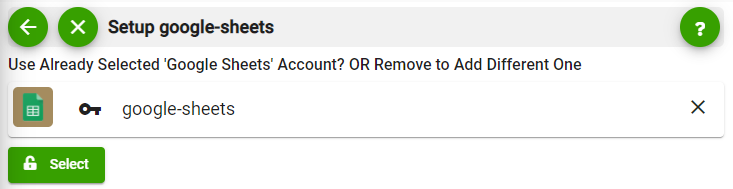
-
Once Rapidomize is connected to your App/Service account, you can proceed with the creation of your
by pressing the “Select” button. -
Now, select your
Triggerfunctionality from the list. (Triggerfunctionalities are either scheduled or instant (new/updated data is available for processing).
 -
Provide configuration details as requested.
-
Test & see whether you can get expected or sample data (for some
Triggers, we provide sample data that allows you to configure next steps).It is super important to test your App/Service to get expected or sample data as that data is needed for you to configure the next steps of your
.

-
Once the
Triggeris set, you need to select anActionApp/Service to use with theTrigger. To add anActionApp/Service to your, drag and drop a service from the list of services. 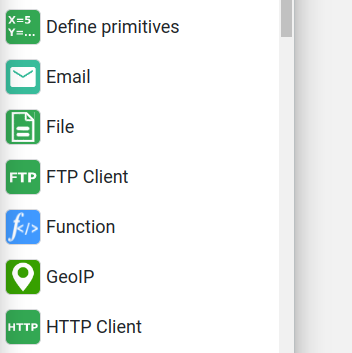
-
Authorize the App/Service if necessary.
-
Select the desired
Actionfrom the list of given actions. -
Provide configuration details as requested.
-
Click on Test / Get Sample Data button to test your
Action(if you don’t test yourActionat this stage, your data will not be available for the next step that you are going to configure. Therefore, you need to test all steps of your workflow).

- If you need to add additional
Actions, follow the steps 11-15 again for each newAction.

-
Save your
by clicking on Save button. -
You can activate the
by clicking the Run toggle button. Once you activate your , it will run according to the specified schedule. 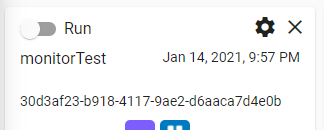
An alternative method to create an ICApp
Choose
All Servicesbutton from the Menu. Select the Trigger type you need and start creating your ICApp.
Create APIs with Rapidomize
Rapidomize enables you to create APIs within minutes or hours, providing access through HTTPS, WebSocket, MQTT, or TCP protocols. Refer How to create APIs.
How to create a rapid interface
With Rapidomize’s rapid interface no-code functionality, you can design a wide range of dashboards, application interfaces, and forms to gather data, analyze responses, and visualize results in real time through streamlined workflows. This workflow is designed to be straightforward and accessible to users of all skill levels. Refer How to create rapid interfaces.
Create Dashboards with Rapidomize
Create fully adaptable dashboards for any sector or objective using the robust and user-friendly Rapid Interfaces, according to your unique needs. Refer Real time data dashboards.

Create Forms with Rapidomize
Leverage this no-code rapid interface feature to create versatile forms for data collection and real-time response analysis through automated workflows. This intuitive tool streamlines processes and enhances your business productivity. Refer How to create Forms.

Manage Apps/Devices with Rapidomize (IoT)
Define and manage the properties of your application or device, capture events for analytics, enable geo-fencing, and more. All through the digital representation of your applications or devices.Refer How to manage properties of Apps/Devices.