How to trigger Alerts
7 min read
Monitoring alerts through automated workflows involves setting up a system that detects, processes, and responds to various conditions or events in your IT infrastructure or applications. Through Rapidomize, you can set the conditions or criteria for events which should trigger an alert.

Once you connect your application or device to us, we can monitor your applications and IT infrastructure for the specified events and trigger alerts when we receive a qualifying event.
Rapidomize can also integrate your alerts with automated workflows (Alert generation function, you can continuously monitor the performance of your applications and devices through automated workflows and respond to alerts immediately. You also can use the alert data to gather feedback to make necessary adjustments to your applications and devices to improve their efficiency and effectiveness.
Here’s a step-by-step guide to achieving this:
-
Rapidomize can trigger alerts for both
AppsandDevices. -
Alerts can be enabled at the entire entity level or at the property level for both devices and applications. As an example, device events like CPU usage, memory usage, network latency and application events like alerts can be set for the hard disk or CPU of a device. High CPU usage, failed login attempts etc. are device level events that can be monitored. Events like eoor rates in applications can also be monitored.
-
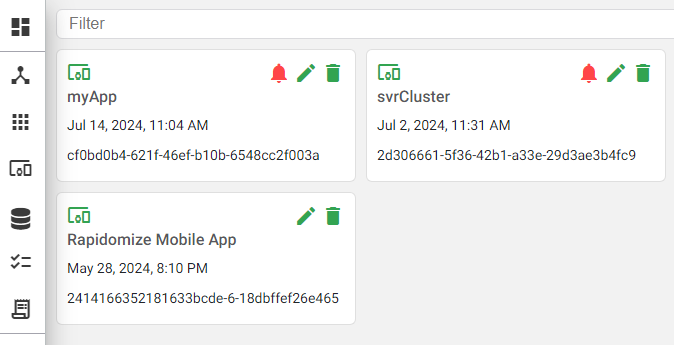
To create an alert, click on the
My Apps & Devicesbutton on the left hand side menu. -
Select the
ApporDeviceyou want to monitor.
- Specify whether you want to apply the alert to entire application or device, or only at a particular property level.
- Create a workflow (
) using My Appas your trigger. SelectWhen a specified event occursas your triggering action. - Use
conditional routerto set conditions for the alert. - Use a ticketing system like
Tasks(internal) , Fresh desk, Jira, Zendesk (external) etc. to create and assign tickets for tasks. - Send notifications via multiple channels including
My App(Mobile rings), Email, SMS, Slack message etc. - Clear or acknowledge alerts manually or through APIs.
How to set alerts for an Application.
- To enable an alert for the entire application, select your
Appfrom the menu and clickEdit App/Devicebutton. - Go to
Generaltab and selectEnable Alerts. - The alert will apply to the entire application.
- Now you need to create a
workflow() which will trigger an Alertwhen a qualifyingeventoccurs in your App and send notifications to pre-specified persons or take automated actions (if pre-specified).
Create a workflow
- Use
App/deviceas the Trigger and drag and drop it to the workflow work screen. - Select the app you want to monitor.
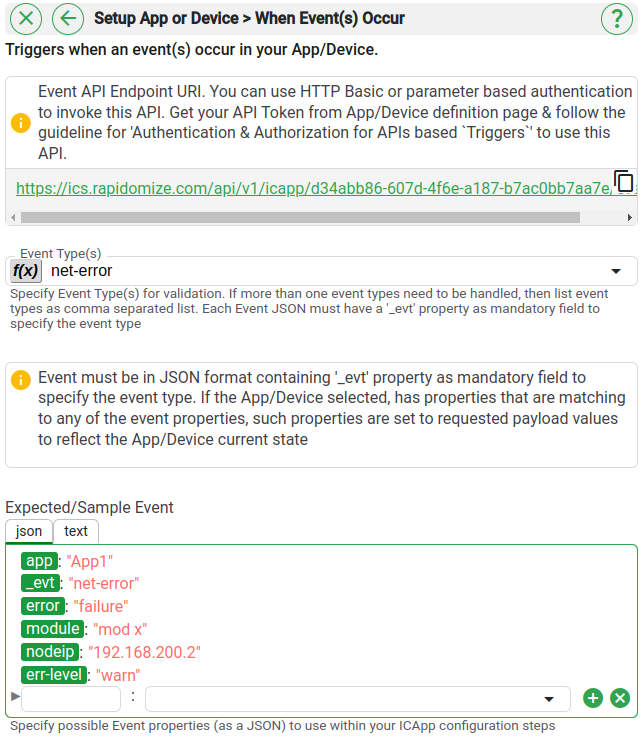
- Select
When events occuras your trigger action and set it up to receive events from your App as follows. - Get your API token as per the guidance given.
- Specify event types you want to monitor as jSON. In here, as this is an App, network errors will be monitored.
- Click on
Test/get sample databutton to test the trigger action.
Set alert conditions (define alert criteria)
- Drag and drop
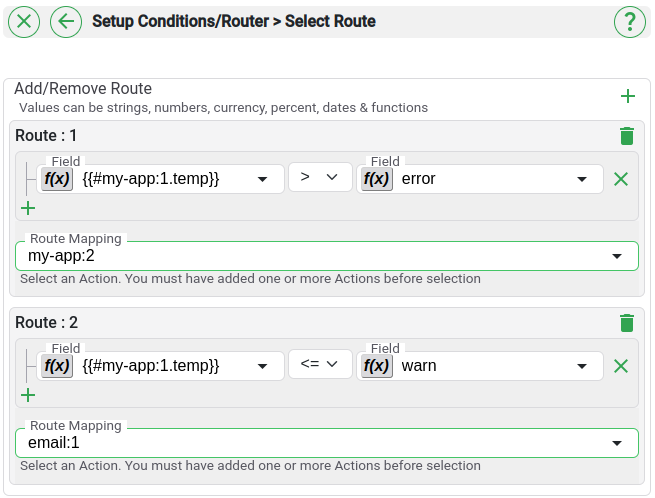
Conditional routing appto the workflow screen and connect it to the trigger. Use this to set up conditions for alerts. - You can set multiple conditions for one route or create multiple routes to perform parallel actions using this feature.
- Define the conditions for each route and specify the
action, i.e. the destination route to send the incoming data if condition(s) is(are) True. - If you need further instructions on routing, refer Conditional routing
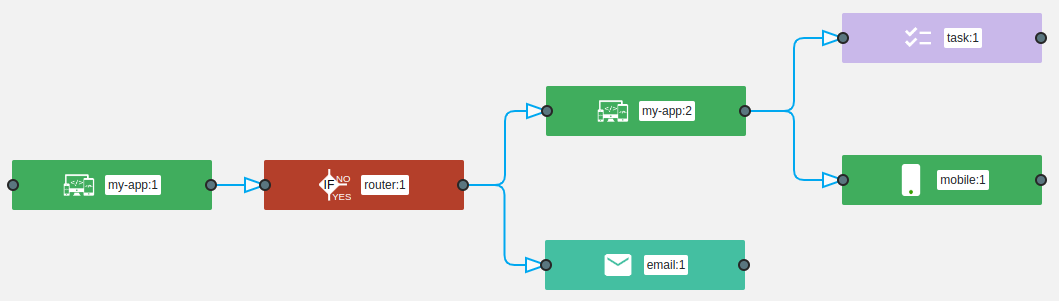
- The conditions that have been set in this workflow are as follows.
- Incoming data from
My app-3are directed toMy app-1if there is a networkerror. - Incoming data from
My app-3are directed toSend Emailif there is awarningmessage.
- To set the
Alertfor the above conditions, double click onMy App1and selectSet or clear Alerts. - Select the alert type and
Setfunction to set the alert for the entire application.

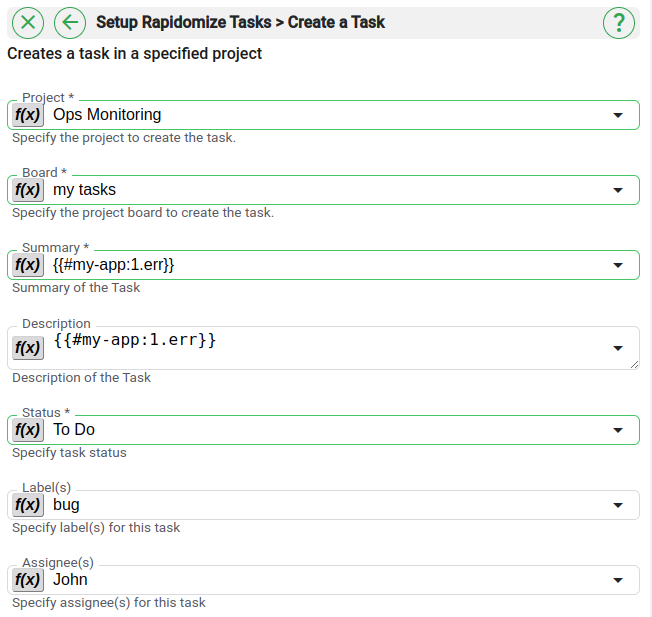
Create Tickets and assign tasks
- You can use Rapidomize’s ticketing system
Tasksto create tickets and assign tasks or notify the right stakeholder when an alert is generated. You can also use any other customer service, project management or ticketing softwares including Jira, Freshdesk, Zendesk, Service now etc. to create tickets. - Here we have used Rapidomize
Tasksas our ticketing system. - An
Alertis created inMy app-1and two parallel actions are created to resolve thenetwork error. Ataskis created for the ops-management team to resolve the error by connectingTasksapp to the workflow. As a parallel action, a Mobile ring will also occur to alert on the network error. You need to install RapidomizeMobile appto use this feature.
- For the second condition, (when there is a network issue and it does not meet error criteria) a notification Email will be sent to the relevant stakeholder. You can send notifications via
Send SMS,Send EmailandMobile App.
How to use Tasks as your ticketing system
- Ticket assigning is done to a
Circle(team). Define yourCircle(members, their contact details, availability etc.) under theProjectwhich you have created your workflow). Refer How to create a circle - Tickets can be assigned as per an
on call schedule. - Can assign tasks depending on the availability or can assign tasks as per a schedule to the members of the
circle.
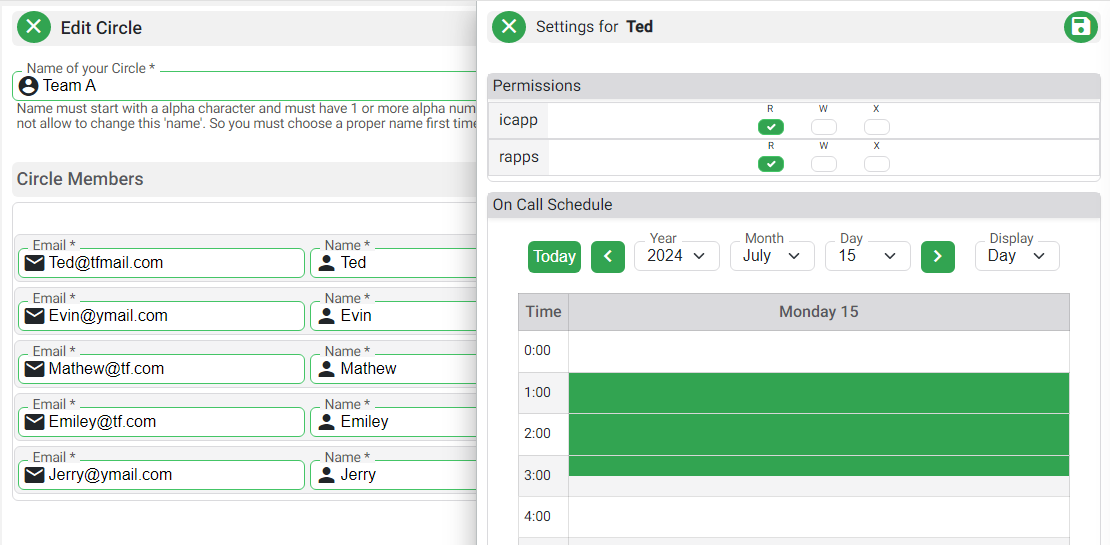
- Once the schedule is completed for all members, can view an overall schedule.
- Can set
Notificationsto be sent to the on-call person. - If no response is received from the on call person, the ticket gets escalated to the management.
- Management can then assigned the ticket to another person in the
Circle. Notify a secondary responder??? - To change or deactivate sending notifications????
- To notify multiple users???
- To create individual on call schedules for each person??/
- Ticket creation depending on the severity of the issue - refer cluster monitoring?????
###3 How to set alerts to only a property of an application
- To enable alerts for a property/s of an application, select your
Appfrom the menu and clickEdit App/Devicebutton. - Go to
Propertiestab. - Under
Name, input the property name you want to monitor. - Choose the
Typeof property, from the drop down menu. - Input the
Threshold valueand set permissions. - Permissions can be set as either
Read,WriteorX. - You can add any amount of properties using (+) button.
- Alerts will be generated for the defined properties.
- Create a suitable workflow to send notifications and assign tasks to the right stakeholder by following the step 4 onwards of How to set alerts for an application.
How to set alerts for a Device.
- To enable an alert for the entire device, select your
Devicefrom the menu and clickEdit App/Devicebutton. - Go to
Generaltab and click onEnable Alerts. - The alert will apply to entire Device.
- Create a suitable workflow to send notifications and assign tasks to the right stakeholder by following the step 4 onwards of How to set alerts for an application.
- To enable alerts for a property/s of a device, click
Edit App/Devicebutton and go toSensors and Actuatorstab. - Under
Name, input the name of the sensor or actuator you will be monitoring. - Choose the
Typeof data coming from the sensor, from the drop down menu. - Input the
Threshold valuesand set permissions. - You can add any amount of properties using (+) button.
Clear/acknowledge alerts
- Once an alert is activated, you also have the option of acknowledging and clearing it (after taking suitable actions to rectify issues, if any).
- This can be done both manually and through an API
- Click on the
Clear Alarmbutton to manually acknowledge your alarm. - You can define your own criteria for setting and clearing the alert by ??????
- To clear/acknowledge alerts automatically, create a UI and a workflow using
My Appas the Trigger and selectSet/Clear Alarmas the trigger action.